Lux 1500 Thermostat Instruction Manual: Overview
This manual details the Lux TX1500UA, TX1500E, and CAG1500 thermostats, covering installation, operation, advanced settings, and troubleshooting. Downloadable PDF versions are readily available.
The Lux 1500 series represents a range of non-programmable and programmable thermostats designed for reliable and efficient home climate control. These models – including the TX1500UA, TX1500E, and CAG1500 – offer user-friendly operation and straightforward installation.
This series prioritizes ease of use, making it suitable for both first-time thermostat users and experienced homeowners. The thermostats are compatible with various HVAC systems, providing versatile heating and cooling management.
Carefully reading this instruction manual is crucial before installation to ensure proper wiring and functionality. Lux Products aims to deliver quality and dependable temperature regulation with the 1500 series, enhancing home comfort and energy efficiency.
Thermostat Model Variations (TX1500UA, TX1500E, CAG1500)
The Lux 1500 series includes three primary models, each catering to different user needs. The TX1500UA is a basic, non-programmable thermostat offering simple temperature control. The TX1500E adds 7-day programmable functionality, allowing customized heating and cooling schedules for enhanced energy savings.
The CAG1500 model is a smart thermostat, providing remote access and control via a mobile app. It offers advanced features like learning capabilities and geofencing.
All models share a common design and installation process, but differ in their operational complexity and features. Selecting the appropriate model depends on your desired level of control and automation. Ensure you refer to the specific manual for your chosen model.

Installation Guide
Proper installation ensures optimal performance. This section details safety precautions, wire identification, wiring diagrams, mounting procedures, and power options for your Lux 1500 thermostat.
Safety Precautions Before Installation
Prioritize safety during installation! Always disconnect power to your HVAC system at the breaker box before beginning any wiring. Failure to do so could result in electrical shock or damage to equipment. Label each wire before disconnecting it from the old thermostat – this is crucial for correct reconnection. Use only Energizer or Duracell alkaline batteries as specified; other battery types may cause damage.
If you are uncomfortable with electrical wiring, consult a qualified HVAC technician. Improper wiring can lead to system malfunction or safety hazards. Ensure the thermostat is installed in a location that is not exposed to direct sunlight, drafts, or excessive moisture. Read all instructions thoroughly before starting the installation process to avoid errors and ensure a safe and successful setup.
Identifying Wire Terminals
Proper wire identification is essential for correct thermostat function. Common terminals include R (power), C (common – often blue), W (heat), Y (cool), and G (fan). The TX1500UA requires careful labeling as it’s a non-programmable model. Note that some systems may have additional wires for features like auxiliary heat (AUX) or emergency heat (E).
Refer to your HVAC system’s wiring diagram and the existing thermostat’s wiring for accurate identification. If unsure, consult an HVAC professional. Incorrect wiring can damage your system. The thermostat base includes clearly marked terminal blocks for easy connection. Double-check all connections before restoring power to ensure a secure and functional installation.
Wiring Diagrams for Different HVAC Systems
The Lux 1500 series accommodates various HVAC configurations. Common systems include conventional heating and cooling, heat pump systems (with and without auxiliary heat), and millivolt systems. Diagrams illustrate wiring for single-stage, multi-stage, and zoned systems.
Carefully match your system type to the corresponding diagram in the manual. Pay close attention to wire colors and terminal designations. Heat pump wiring differs significantly from conventional systems, requiring correct connection of the reversing valve wire (O/B). Always disconnect power before wiring. If your system doesn’t match a provided diagram, consult an HVAC professional for guidance. Incorrect wiring can cause system malfunction or damage.
Mounting the Thermostat Base
Before mounting, ensure system power is OFF at the breaker. Remove your old thermostat, carefully labeling each wire as you disconnect it – this is crucial! Use the provided mounting screws and wall anchors to securely attach the thermostat base to the wall. Ensure the base is level for accurate temperature readings.
Feed the wires through the opening in the base. Double-check that no bare wires are exposed to prevent short circuits. The base should be mounted in a location away from direct sunlight, drafts, and other sources of temperature interference. Once securely mounted, proceed with wiring according to the appropriate diagram for your HVAC system.
Installing Batteries and System Power Options
The Lux TX1500 series thermostats offer flexible power options. Install two Energizer or Duracell alkaline batteries into the battery compartment, observing correct polarity. The thermostat can operate solely on battery power, or utilize “System Power” – drawing power directly from the HVAC system.
If using System Power, the batteries serve as a backup, maintaining settings during power outages. The Battery Monitor functionality alerts you when battery replacement is needed. Disabling the Battery Monitor is only recommended when relying exclusively on System Power. Ensure proper battery installation for optimal performance and accurate temperature control.

Operating Instructions
Learn to navigate the display icons, set desired temperatures, and switch between Heat, Cool, and Auto modes for comfortable climate control with your Lux thermostat.
Understanding the Display Icons
The Lux TX1500 thermostat’s display utilizes several icons to communicate system status. A flame icon indicates the heating system is active, while a snowflake signifies cooling is engaged. The ‘Auto’ icon shows the thermostat will automatically switch between heating and cooling to maintain the set temperature. A fan icon displays the fan’s operational mode – ‘Auto’ or ‘On’.
Battery indicators alert you to low battery levels, prompting replacement with Energizer or Duracell alkaline batteries. Other icons may indicate programming mode (TX1500E) or system errors, requiring troubleshooting. Familiarizing yourself with these icons ensures efficient operation and quick identification of potential issues. Refer to the full manual for a comprehensive icon glossary and detailed explanations of each symbol’s meaning.
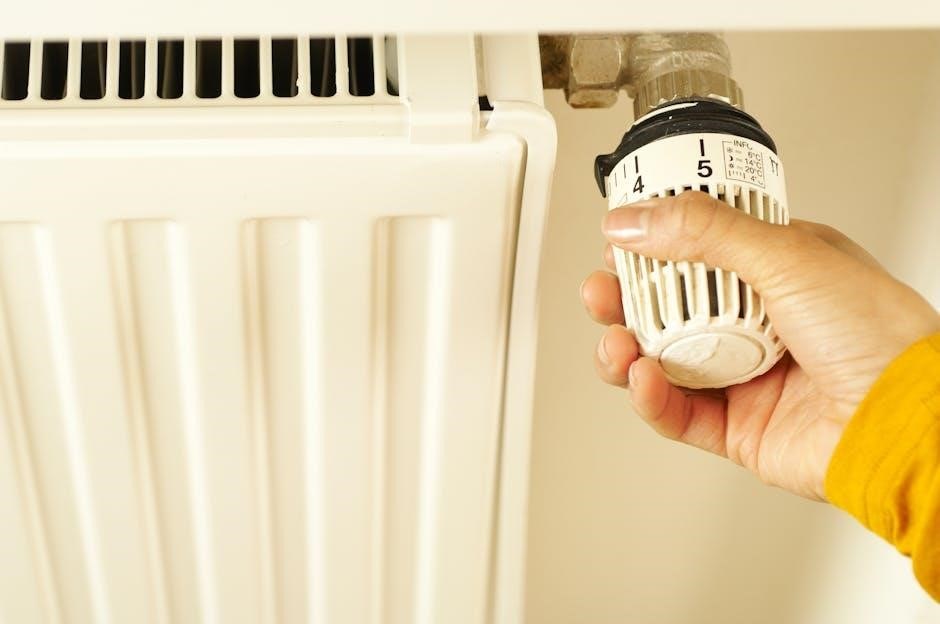
Setting the Temperature
To adjust the desired temperature on your Lux TX1500 thermostat, utilize the up and down arrow buttons located on the front panel. Each press will incrementally increase or decrease the setpoint by one degree. The current set temperature is prominently displayed on the LCD screen. Ensure the thermostat is in ‘Heat’ or ‘Cool’ mode before adjusting the temperature for effective climate control.
For programmable models (TX1500E), temperature settings can be customized for different times of the day and days of the week. Refer to the programming section of this manual for detailed instructions. Always allow sufficient time for the system to respond to temperature changes, typically several minutes, for optimal comfort and energy efficiency.
Switching Between Heat, Cool, and Auto Modes
Your Lux TX1500 thermostat offers three operational modes: Heat, Cool, and Auto. To cycle through these modes, press the ‘Mode’ button on the thermostat’s control panel. The currently selected mode will be indicated by a corresponding icon on the display screen. In ‘Heat’ mode, the thermostat activates the heating system when the room temperature falls below the setpoint. ‘Cool’ mode activates the cooling system when the temperature exceeds the setpoint.
‘Auto’ mode intelligently switches between heating and cooling to maintain the desired temperature range. Ensure your HVAC system is configured for Auto operation before utilizing this feature. Proper system configuration is crucial for optimal performance and energy savings.
Fan Control Settings (Auto, On)
The Lux TX1500 thermostat provides two fan control options: ‘Auto’ and ‘On’. The ‘Auto’ setting operates the fan only during heating or cooling cycles, optimizing energy efficiency and maintaining consistent temperature distribution. When the system isn’t actively heating or cooling, the fan remains off. Selecting the ‘On’ setting forces the fan to run continuously, regardless of heating or cooling demand.
Continuous fan operation can improve air circulation and filtration, but it will consume more energy. To toggle between ‘Auto’ and ‘On’ modes, use the ‘Fan’ button on the thermostat. The selected mode is clearly displayed via an icon on the LCD screen. Consider your indoor air quality needs when choosing a fan setting.
Using the Programmable Features (TX1500E)
The TX1500E model offers programmable settings for customized temperature control throughout the day. This feature allows you to create a schedule with different temperature setpoints for various times and days of the week, maximizing comfort and energy savings. Access the programming mode by pressing and holding the ‘Program’ button.
Navigate through the programming options using the up and down arrow buttons, setting desired temperatures for ‘Wake’, ‘Leave’, ‘Return’, and ‘Sleep’ periods. Confirm each setting by pressing the ‘Program’ button again. The thermostat supports separate schedules for weekdays and weekends. Review the programmed schedule to ensure it aligns with your lifestyle.

Advanced Settings & Troubleshooting
Explore battery monitor functionality, factory reset options, and solutions for common issues like no power or incorrect temperature readings. Error codes are also defined.
Battery Monitor Functionality
The Lux TX1500 thermostat incorporates a battery monitor feature designed to alert users when the installed batteries are running low. This proactive notification helps prevent unexpected thermostat shutdowns and ensures continuous climate control. It’s crucial to utilize Energizer or Duracell alkaline batteries for optimal performance and longevity.
The battery monitor can be enabled or disabled within the thermostat’s settings. Ensure this setting remains enabled unless powering the thermostat solely through System Power without batteries present. Conversely, disabling Battery Monitor when relying on batteries will prevent low battery warnings. Regularly check battery levels, especially during periods of extreme temperatures, to maintain reliable operation. A flashing low battery icon on the display indicates it’s time for replacement.
Resetting the Thermostat to Factory Defaults
Resetting your Lux TX1500 thermostat to its factory default settings will erase all personalized programming, including temperature schedules, fan settings, and any custom configurations you’ve made. This is useful for troubleshooting persistent issues or preparing the thermostat for a new user. The exact reset procedure may vary slightly depending on the specific model (TX1500UA, TX1500E, or CAG1500).
Typically, resetting involves holding down a specific combination of buttons on the thermostat for a designated period – often around 5-10 seconds. Consult the full instruction manual for the precise button sequence for your model. After the reset, you’ll need to reconfigure all settings from scratch, as if the thermostat were brand new. Back up important settings before resetting.
Troubleshooting Common Issues (No Power, Incorrect Temperature)
If your Lux TX1500 thermostat displays “No Power,” first verify battery installation (Energizer or Duracell Alkaline recommended). Ensure proper contact and consider replacing batteries, even if seemingly new. Check the system power option; if enabled, confirm the HVAC system is supplying power to the thermostat. For “Incorrect Temperature” readings, calibrate the thermostat if your model supports it.
Confirm the thermostat isn’t exposed to direct sunlight or drafts, which can skew readings; Verify correct wiring according to the installation guide. If issues persist, a factory reset might resolve software glitches. If problems continue, consult Lux Products customer support or the detailed troubleshooting section within the complete instruction manual.
Error Code Definitions
While specific error codes for the Lux TX1500 series aren’t extensively detailed in readily available resources, a general approach to interpreting issues is crucial. A lack of display often indicates a power failure – check batteries and system power connections. Inconsistent temperature readings may suggest a calibration issue or sensor malfunction. If the thermostat cycles erratically, verify wiring connections and HVAC system compatibility.
Consult the full instruction manual’s troubleshooting section for model-specific codes. If an unrecognized error appears, record it and contact Lux Products customer support for assistance. Proper documentation of the error and surrounding circumstances will expedite the support process, leading to a quicker resolution of the issue.
Technical Specifications
The Lux 1500 series utilizes Energizer or Duracell alkaline batteries, with a broad temperature range and specified accuracy for reliable climate control.
Power Requirements (Battery Type: Energizer or Duracell Alkaline)
The Lux TX1500 thermostat is primarily powered by two AA-size alkaline batteries, specifically recommending Energizer or Duracell brands for optimal performance and longevity. Using other battery types may result in inaccurate readings or reduced operational lifespan.
System power can also be utilized, offering an alternative or supplementary power source. When system power is available, the thermostat can operate without batteries, or batteries can extend functionality during power outages. The Battery Monitor feature, when enabled, alerts users when battery replacement is needed.
Ensure correct battery polarity during installation. Disabling the Battery Monitor is advised if solely relying on system power, preventing unnecessary low-battery alerts.
Temperature Range
The Lux TX1500 thermostat is designed to operate effectively within a broad temperature range, ensuring reliable performance in diverse climates. The thermostat can display temperatures ranging from 32°F to 99°F (0°C to 37°C). However, the optimal and most accurate temperature control is typically achieved within a narrower band.
While the thermostat can display temperatures outside this range, the internal components are best suited for operation between 40°F and 100°F (4.4°C and 37.8°C). Exposure to extreme temperatures, either hot or cold, for prolonged periods may affect the thermostat’s accuracy and lifespan.
Consider the ambient temperature when selecting a location for installation to maximize the thermostat’s performance.
Accuracy Specifications
The Lux TX1500 thermostat is engineered for reliable temperature sensing, but inherent limitations exist in all electronic devices. The thermostat boasts a temperature accuracy of ±1°F (±0.6°C) under typical operating conditions. This means the displayed temperature may vary by up to one degree Fahrenheit from the actual ambient temperature.
Several factors can influence accuracy, including thermostat placement, airflow around the unit, and the presence of direct sunlight or drafts. Calibration is not typically required or supported for this model. Consistent and accurate readings are best achieved by following the installation guidelines.
Regularly check the thermostat’s performance against a known accurate thermometer to ensure it continues to meet your needs.

Resources & Support
Access the full PDF manual online, or contact Lux Products customer support for assistance. Warranty details and helpful FAQs are also available on their website.
Downloading the PDF Manual
Obtaining a digital copy of the Lux 1500 thermostat instruction manual is straightforward. Several online resources host the PDF version, ensuring easy access for users. Websites like ManualsLib and others archive documentation for various Lux models, including the TX1500UA, TX1500E, and CAG1500.
A quick online search for “Lux TX1500 manual PDF” will yield numerous direct download links. These manuals typically include detailed installation guides, operating instructions, troubleshooting tips, and technical specifications. Ensure the PDF you download corresponds to your specific thermostat model for accurate information. Downloading the manual allows for convenient offline access and printing, providing a readily available reference during installation or operation.
Contacting Lux Products Customer Support
For direct assistance with your Lux 1500 thermostat, reaching out to Lux Products customer support is recommended. While specific contact details may vary, their official website typically provides comprehensive support options. These often include a dedicated support email address and a phone number for direct communication with a support representative.

Many users find helpful FAQs and troubleshooting guides on the Lux Products website, potentially resolving common issues without needing to contact support directly. When contacting support, having your thermostat model number (TX1500UA, TX1500E, or CAG1500) readily available will expedite the process. Be prepared to describe your issue clearly and concisely for efficient assistance.
Warranty Information
Lux Products typically offers a limited warranty on their TX1500 series thermostats, covering defects in materials and workmanship. The standard warranty period is generally one year from the date of original purchase, though specific terms can vary depending on the model (TX1500UA, TX1500E, CAG1500) and the retailer.
To make a warranty claim, you’ll usually need to provide proof of purchase, such as a receipt or invoice, and a detailed description of the defect. The warranty typically covers repair or replacement of the defective thermostat, at Lux Products’ discretion. It’s crucial to review the full warranty documentation, often available on their website, for complete details and exclusions.
Online Resources and FAQs
Lux Products maintains a comprehensive online support portal for the TX1500 series thermostats, offering a wealth of resources for users. This includes downloadable PDF versions of the instruction manual for models like the TX1500UA, TX1500E, and CAG1500. A frequently asked questions (FAQ) section addresses common issues and troubleshooting steps, providing quick solutions to everyday problems.
Users can also find helpful videos and tutorials demonstrating installation and operation. Furthermore, online forums and communities dedicated to home automation often feature discussions and user-shared tips related to Lux thermostats. These resources provide a collaborative environment for finding answers and resolving technical challenges.

Understanding Lux, Illuminance and Related Terms
Lux (lx) measures light intensity, representing lumens per square meter. It differs from ANSI lumens and nits, impacting lighting applications and visual perception.
What is Lux (lx)? Definition and Explanation
Lux (lx) is the standard unit of illuminance, measuring the quantity of light falling on a surface; Specifically, one lux equals one lumen per square meter. It quantifies how brightly a surface is illuminated. Derived from the concept of luminous flux (lumens), lux provides a practical measure for assessing lighting levels in various environments.

Essentially, lux describes the perceived brightness to the human eye. It’s crucial in lighting design, photography, and even thermostat functionality, as light sensors often utilize lux measurements; Understanding lux helps determine appropriate lighting for tasks and ensures optimal visual comfort. The term originates from the Latin word for light, simplifying its representation as ‘lx’.
Relationship between Lumens and Lux
Lumens measure the total amount of visible light emitted by a source, while lux measures the intensity of light falling on a surface. They are intrinsically linked, but represent different aspects of illumination. Lux is calculated by dividing the luminous flux (lumens) by the area over which it’s distributed. Therefore, a higher lumen output doesn’t automatically equate to higher lux levels.
The distance and distribution of light significantly impact lux. A concentrated beam of lumens over a small area will yield high lux, whereas the same lumens spread over a larger area will result in lower lux. Understanding this relationship is vital for optimizing lighting design and interpreting light measurements accurately. Essentially, lumens are what the light source emits, and lux is how much reaches a surface.
Lux vs. ANSI Lumens vs. Nits
These three units measure different aspects of light, often causing confusion. Lux, as established, measures illuminance – light falling on a surface. ANSI lumens specifically quantify the total light output of projectors, a standardized measurement for comparing projector brightness. Nits, or candelas per square meter (cd/m²), measure luminance – the brightness of light emitted from a display.
The key difference lies in their application. Lux is relevant for ambient lighting and assessing how well an area is lit. ANSI lumens are crucial for projector selection, indicating overall brightness. Nits are vital for display quality, determining how vivid and bright the image appears. Converting between them isn’t straightforward, as it depends on factors like beam angle and surface reflectivity.
Applications of Lux Measurement in Lighting
Lux measurement is fundamental across diverse lighting applications, ensuring optimal illumination levels for various tasks and environments. In workplaces, lux levels are crucial for productivity and safety, adhering to standards like those set for office lighting or industrial settings. Retail spaces utilize lux measurements to highlight products and create appealing atmospheres, influencing consumer behavior.
Furthermore, lux is vital in horticultural lighting, optimizing plant growth by providing the correct light intensity. Architectural lighting design relies heavily on lux calculations to achieve desired aesthetic effects and functional illumination. Road and street lighting employ lux standards to guarantee visibility and safety for drivers and pedestrians. Accurate lux measurement ensures efficient and effective lighting solutions.
Leave a Reply